Activities

At a loss for an activity or talk? You’ve come to the right place! Supplies for outreach activities are stored in the supply closet across from the front office; your submaster key (the one that opens the conference room) will open the supply closet. Two portable telescopes and crafts/activities are stored there, whereas the “really good” telescope in the big black box and the Tombaugh solar telescope are in the poster printer room, the auto-pointing Meade is in South Dome, and the terrestrial globes and modern solar telescopes are in the BX 102 closet.
A spreadsheet listing all of these telescopes can be found here.
A helpful chart of some of the below activities can be found here.
Table/Booth Demonstrations
Volunteers: 2
Materials: folding table, pretty poster, demo equipment, sorting cards, flyers
Some events are conducive to setting up a table with short activities and handouts. The easy part is grabbing the extra folded up table (from the South Dome, though usually tables are provided at events), covering it with the tablecloth (in the outreach boxes in the supply closet), and attaching the Astro Dept banner (also in the Outreach Supplies boxes). What do you put on this gorgeous blank slate? We’ve found a good combination of stuff, posters, and demonstrations:
- 3D-printed craters and Mars rover (located in supply closet)
- Paper model of JWST (located in supply closet)
- AstroQuackers (“fortune tellers”) with solar system trivia! Sun, Moon, Terrestrial planets, Gaseous planets
- Make printouts with the next Open House and events
-
Self-guided solar system tour with these planet sheets, something neat for people to read while walking around or waiting in line
- Ask Ofelia if she has any astronomy-related items (bookmarks, brochures for APO, pens) to hand out
- Have kids play with Jillian’s sizes, distances, and galaxies sorting cards – also provided in laminated form in the Outreach Supplies boxes!
- Let kids pick up the big meteorites (in metal toolbox and orange case in Ofelia’s office), and maybe accompany them with the Build-An-Asteroid activity described below
- Terrestrial globes (located in BX 102 closet)
- Moon phases wheel diagram (there’s a couple already made in the supply closet)
- Do the cratering demo using the Comet Lab supplies (tub of flour, flashlight, metal ball, magnet, block of wood, haircomb)
General Astro (Talk)
Time: ~10-45 minutes
Volunteers: 1
Materials: projector and computer
Optional Materials: sorting cards
Use the general astronomy presentation (53MB PowerPoint, 8.3MB OpenOffice, 1.7MB PDF) developed by Cat and passed among the grad students.You can also use the DPS Discoveries in Planetary Science series. There are about a dozen or so topics listed; for each topic, you can download a 4-slide file (PowerPoint or PDF). The first slide describes the new discovery, the second slide provides some more detailed information, the third slide puts the discovery into a Big Picture context, and the fourth slide provides links for more information. These are put out by the DPS Education committee and thus have been vetted for scientific content as well as educational impact. They are intended for use in public events or intro astronomy lectures.
You can also break up the talk with sorting activities. Jillian created 6 sets of three different kinds of sorting cards:
- object sizes in the solar system: Laminated cards are in the outreach boxes. Good for messing with people’s idea of sizes (especially Ganymede and Mercury). Includes Pluto, our Moon, Mercury, Ganymede, Mars, the Earth, Jupiter, and the Sun. Second page with the answers is setup to print on the back of the appropriate card.
- distances in the solar system and galaxy: Laminated cards are in the outreach boxes. Good for messing with people’s idea of distances even within our solar system. Includes the HST, the Moon, the Sun, a comet, the nearest star, the nearest imaged exoplanet (Fomalhaut), the Pleiades, the distance through the Milky Way disk, the distance to the Milky Way center, and the distances to M31. Second page with the answers is setup to print on the back of the appropriate card.
- types of galaxies: Not laminated, but easily printable. Like a little galaxy morphology lab (give a galaxy to each student, have them “find a friend with the same galaxy”). Includes 4 ellipticals, 4 spirals, and 4 irregulars.
Earth-Moon Scale Model + Distance (Activity)
Time: ~10 minutes
Volunteers: 1
Materials: blue and gray balloons
- https://www.jpl.nasa.gov/edu/teach/activity/modeling-the-earth-moon-system/
- Inflate blue balloon to ~8 inches width
- Have students guess how size of Moon compares to that Earth
- Moon diameter is ~0.25 of Earth’s, blow up gray balloon to be that size
- Ask how far away they think the Moon is from the Earth, move it away and have them vote on where they think it should be. At the above scale, it will be ~6 meters (~20 feet) apart
Beads+String Scale Model of the Solar System (Activity)
Time: ~15 minutes
Volunteers: 2
Materials: Pre-made, 2 sets of 5 meters of yarn, one with beads tied to string in correct planet distances, another with beads loose and sliding. Also, little baggies with small pieces of yarn and handful of beads for students to make their own bracelet solar system.
- Could start this activity with the intro Astro talk (above) to introduce the solar system if this is in a classroom setting
- Have students move beads along the string where they think the planets should go
- Get two students (or teachers) to hold the string with loose beads in place, then get the string with fixed beads and hold next to the loose bead string to compare, teach students about distance differences in terrestrial vs. gas giant planets
- For reference (or if needing to make new one colors and distances are: Mercury (orange, 4cm), Venus (yellow, 7cm), Earth (blue, 10cm), Mars (pink, 15cm), Jupiter (large dark wood with ridges, 52cm), Saturn (large light wood, 96cm), Uranus (translucent green, 192cm), Neptune (translucent blue, 300cm), Pluto (purple, 395cm)
- The DIY bracelets are 30cm long, each one put into baggie with 9 beads, Sun+8 planets
Sundial and/or UV Bead Bracelets (Activity)
Time: Sundial (~15 minutes) + UV Bead Bracelets (~10 minutes)
Volunteers: 1
Materials: Sundial: paper plates, colored pencils, popsicle stick. UV bead bracelets: black pipecleaners, UV-sensitive beads
Sundial: Have students draw numbers around rim of paper plate (do 12 and 6, then 3 and 9, then fill in others). Let them draw their favorite planet or space theme in the center. Cut hole in center, pierce with popsicle stick.
UV Bead Bracelets: Start students in shade if possible, have students pick favorite beads colors (maybe only a handful so we don’t run out too soon), place onto pipecleaners, walk out into sunlight and watch them change colors!
Build An Asteroid (Activity)
Time: ~20 minutes
Volunteers: 2
Materials: In supply closet: gray clay, pebbles/rocks, pony beads, presentation about asteroids (could slightly modify the comets+meteors talks)
- Give short presentation on asteroids (what they are, where they come from, etc.)
- Connect to our collection of meteorites
- Cut 1” x 1” x 0.5” (roughly clementine-sized) for each student
- Let them play with clay and mold it to random asteroid shape (doesn’t have to be spherical), add craters if desired
- Push 3 rocks/pebbles and 4-5 pony beads (purples/blues/reds)
Comets and Meteors (Talk and Activity)
Time: ~20-30 minutes
Volunteers: 4 can keep an eye on 25 fourth graders and make setup/cleanup easier
Materials: projector and computer; Dry Ice Version: comet lab supplies (dry ice, water, dirt, ammonia, buckets, bags, spoons, gloves). Household Item Version: In separate box in supply closet, styrofoam balls, streamers, skewers, ribbons, etc.)
Optional Materials: department meteorites, solar telescopes
Takes ~20 minutes to build and play with comets. This works well with a short intro on comets (1.3MB PPT, 1.3MB ODP, 1.1MB PDF) or a longer talk using part of the general astro presentation. Bring the department meteorites to show the students. They should be in Ofelia’s office in a large metal toolbox plus the bright orange case. Also, you can bring the solar telescopes so that kids can look through those while waiting to make comets. Some stores in town such as Albertson’s sell dry ice. Make sure to save your receipt to get reimbursed. The rule of thumb for how much ice to get is 6-7 pounds per 30 people.
Instructions for Household Item Version:
- Pierce the styrofoam with skewer
- Glue 1-3 cotton balls wherever you want, could make a bi-lobed comet!
- Tape ~1ft streamer (dust tail) to the back of the comet
- Tape ~1ft sparkly ribbon (ion tail) to the back of the comet
- Wrap/crinkle ~6”x18” piece of mesh around nucleus to be the coma
- Remove skewer and re-pierce styrofoam ball with mesh so that the mesh stays
Glitter Galaxies (Activity)
Time: ~20 minutes
Volunteers: 1
Materials: glitter (red, blue, gold), small clear plastic plates, craft glue
Quick Guide
Sometimes it’s nice just to have a quick crafting activity to teach a basic concept. This activity is fun, somewhat messy, and introduces kids to different kinds of galaxies (and stars). Supplies are stored in the copier room in a cardboard box labeled “Outreach Supplies.”
Show the kids examples of galaxies, either by borrowing Galaxy Morphology Lab Binders from Bx102 or Jillian’s galaxy cards. Have them pick their favorite and make it on a plastic plate with glue and glitter. Since the plates are clear, you can use their shadows to show the effects of inclination. Kids like having something they can take home, too.
Saturn Model (Activity)
Time: ~30 minutes
Volunteers: 1
Materials: glitter (gold, silver), 2″ styrofoam balls, small clear plastic plates (or spare CDs), craft glue, toothpicks, paperclips, string, paintbrush, scissors, 2 bowls (one to catch silver glitter, one to catch gold glitter)
Quick Guide
Everyone loves Saturn’s rings, so this activity lets kids build their own model of Saturn. First cut the styrofoam ball in half and stick a toothpick through the center of the flat side of each half. Decorate the ball by ‘painting’ glue in stripes and sprinkling glitter on it. Wash the brush in between glue application so it doesn’t get stiff. While you wait for Saturn to dry, decorate the plastic plate as rings in the same manner but leave a 2″ circle in the center where you’ll attach the balls. Don’t use too much glue so it dries in a reasonable amount of time. When the planet and the rings are dry, you’re ready to assemble them. Remove the toothpick from the half-balls, put glue on the center of the plastic plate on both sides, and attach a half-ball to each side of the plate. If you’re using CDs, this is trickier since you’ll remove one half-ball’s paperclip and make a Saturn shish-ka-bob with the other (one half-ball, CD, other half-ball all speared on one toothpick). Open a paperclip to form a long-handled hook, and poke the long handle into one of the half-balls about 3/4″ from the pole to simulate Saturn’s 28o axial tilt. Tie some string to the paperclip hook so the kids can hang up their awesome planet.
Career Day (Talk)
Time: ~35 minutes
Volunteers: 1
Materials: projector and computer
Some schools ask us to do talks for Career Day. This presentation (3MB PDF + 120MB movies) covers the basics of life as an astronomer and includes a few examples of neat research (like Martian dust devils, solar activity, exoplanets, galaxy simulation, and the Bolshoi simulation). Since these presentations include movies, please check that they will play on the computer you’re using.
Tidal Heating (Talk & Activity)
Time: ~1 hour
Volunteers: 1
Materials: projector and computer; printouts of activity and solutions, plastic hairbands (Goody brand “bright and bold plastic hairbands” from Walmart seems to work really well).
This neat talk and demo give people a good understanding of tidal heating and possibly a slight understanding of tidal forces. The talk (1.1MB PDF +1.9MB notes PDF + animated gif) introduces tidal forces, has an intermission for the activity, and then introduces the effects of tidal heating (Io’s volcanoes, Europa’s surface, icy jets on Enceladus and Triton). The tidal definition is currently not completely accurate and needs to be updated.
The Sun (Talk & Activity)
Time: ~1 hour
Volunteers: 2 volunteers
Materials: projector and computer; solar telescopes
Optional Materials: handheld spectrographs
The talks go over the basics of the Sun and show how crazy it can be when it’s active. We split up the talks so the kids wouldn’t have to sit still as long. First you give the Quiet Sun talk (5.3MB PPT+movies, + 530KB notes PDF), then look at the Sun through the solar telescopes, and then give the Active Sun talk (187MB PPT+movies). Since these presentations include movies, please check that they will play on the computer you’re using. Check out SpaceWeather to see if there will be any cool sunspots that day.
An activity is mentioned at the end of the Quiet Sun talk. We could only handle a few kids at a time at the solar telescopes, so we occupied the rest of the kids by having them draw spectra. We gave them the handheld spectrographs and asked them to draw the different kinds of spectra they could find (sunlight reflecting off a railing, the fluorescent lights, etc.) with crayons.
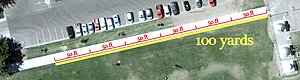
Scale Model of the Solar System (Outdoor Activity)
Volunteers: 2
Materials: planet flags (12.3MB tarball of PDFs), pinwheels/flashlights, small rocks
Optional Materials: printouts of football field solar system worksheet (1.3MB PDF); printouts of planet cards (4.2MB PDF); sidewalk chalkQuick Guide