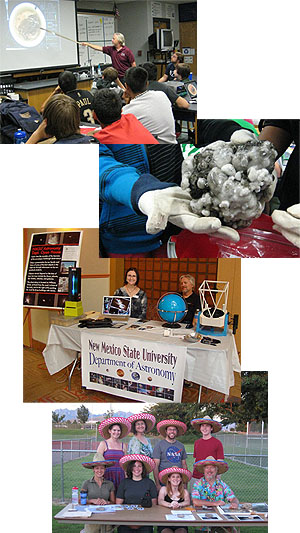
Observatory & Outreach

Why Do Outreach?
The astro department gets a number of requests from
community. Outreach is
a way of giving back to a community which is surprisingly interested in
the same thing that we are. The astronomy department requires that you participate in at least a couple of events per year. In addition, if you want university funding from ASNMSU or GSC, you will need more hours.
If you take pictures of students participating in your event, you will need to get permission from the students’ legal guardians. Get the teacher’s email, send them the pictures you want to use and the release form, and ask them to forward the form to the legal guardians of the students.
Types of Outreach
Outreach activities might involve giving a talk, running a demonstration, or showing people cool things through a telescope. Some events occur regularly, but any school or organization can contact the department and ask for us to come out and do something. This request is passed to the AGSO Vice President, who rounds up volunteers. To get credit for doing outreach, you must have a representative sign the community service form and then give the form the AGSO Vice President. If someone is interested in an event, either direct them to the department outreach request form or have them email the AGSO VP: outreach@astronomy.nmsu.edu.
Talks and Activities at Local Schools
Peruse our selection of field-tested activities and talks.
Schools have asked for people to give talks, like about Pluto or for career day, and to bring demonstrations and activities, like building a comet or understanding the phases of the Moon. They should provide details about the length of the talk, how many people you’ll be talking to, and a recommended subject. Don’t forget to have someone sign the community service form!
Supplies for outreach activities are stored in the copier room in a cardboard box labeled “Outreach Supplies”. This box also has two blue tablecloths for any table setups, as well as a banner for our
Tombaugh Observatory
Everyone can volunteer at the Campus Observatory during the week. The undergrads taking 110 are required to come to this. The Observatory TA sends a request for volunteers at the beg
inning of the semester. Two or three people sign up for each night and are listed on the observatory calendar. The Observatory TA is the representative to sign the community service form; however, they usually just keep track of who volunteered when and write up forms as requested (this saves paper).
If you volunteer, you should know how to operate the telescopes and domes. Below you will find a plethora of valuable information, and there are also instructions attached to each telescope for startup and shutdown. (Telescope guide, and older South Dome instructions). Volunteering at the campus observatory is a great way to get used to the telescopes and the night sky.
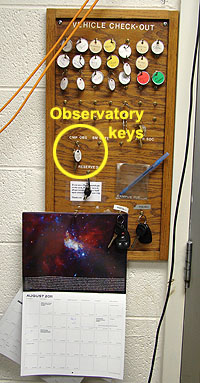
What do you need to do to run the observatory? Update the website and the answering machine (in AY 119, the conference room) indicating whether or not the observatory will be open that night (do this at least an hour before observatory starts). Make sure you have keys, for the domes and the gates to the domes are locked. There is a spare set of keys in the server room (AY 116A), in the same area as the department car keys. If you need to borrow the keys, please return them that evening. TAs should arrive at least half an hour before the event starts.
What objects will be looked at in any given semester? That depends on the season, Moon phase, and cloud coverage, but here are some suggestions for each season: Fall, Winter, Spring, Summer. Usually the Observatory TA picks four objects (3 objects and 1 constellation) for each half of the semester, but it helps to have backup objects in case of patchy clouds. Curious about the exact altitude of an object? Either go hardcore and calculate an air mass or just eyeball it. There are laser pointers in black pouches (and spare batteries) on the left wall of the North Dome closet.
It helps to choose eyepieces that are best suited for each object. Eyepieces are identified by their focal length in mm, and this determines their magnification. A larger (e.g. 32mm) eyepiece has a lower magnification and wider field of view than an eyepiece with a shorter focal length. Planets and planetary nebulae are usually best viewed with higher magnification (shorter focal length) eyepieces, while galaxies, nebulae, and star clusters are better with wide fields of view. However, the higher magnification (~9mm) eyepieces usually have very small lenses to look through, which can be difficult for the general public. Don’t be afraid to swap eyepieces out and see what works best! We have [O III] filters in North Dome that might be useful on some nebulae.
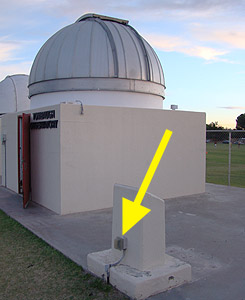
There’s an outdoor power outlet at the base of the plinth with the plaque dedicated to Tombaugh. It’s useful for powering the 8″ without running an extension cord all the way into a dome. If the power doesn’t work, it’s possible that the circuit breaker was tripped (it is on a GFCI). The reset button is found on the face of the power outlet located on the small wooden post on the NE corner of our compound.
 |
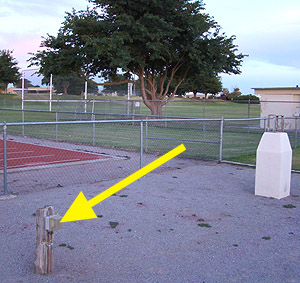 |
| Outdoor power outlet | Reset button for the fuses |
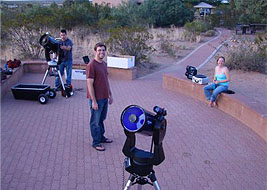
Standard equipment for outreach is two of the 8″ telescopes, laser
pointers, and a step ladder, but technically you can take whatever you can transport. Make sure that you have whatever you need for each telescope. In particular for the 8″ telescope make sure you have an eyepiece, the d
iagonal (for angling the eyepiece more conveniently), the control paddle, the tripod, and the screw to attach the telescope to the tripod. Also keep in mind that the 8″ can run either on battery power (8 C batteries) or from an outlet (in which case don’t forget the power supply and extension cords). Leave plenty of time to load and unload whatever you bring: you do not want to handle telescopes in a hurry. Check ahead of time that whatever you’re bringing fits safely in your vehicle.
As always, before you show people something in the telescope, prime them for what they will be seeing. This is especially important for fainter objects like planetary nebulae and galaxies, where they might have to use averted vision. Chances are that people are expecting Hubble-quality images and might get frustrated or disappointed when they don’t see full color gorgeous images.
It’s fun to hand out sky charts, and they’re available in both English and Spanish. We suggest you print a sky map out in color, first, and then make black and white photocopies (darkening it slightly). If you print the sky map out on the black and white printer, the Milky Way vanishes completely.
Don’t know what objects to show? Here are some suggestions:
-
- Objects:
- Check out the objects list used for observatory during the Fall, Winter, Spring, and Summer.
- It’s also useful to mention any upcoming meteor showers.
- Planets are always neat to show.
- Jupiter is always nice; check and see which moons are visible (in real time) and if the Great Red Spot is visible
- Saturn is also a show-stopper; check and see which moons are visible (in real time)
- Globular clusters and open clusters are a good second.
- Planetary nebulae are cool, but chances are that they’ll be fuzzy smudges in the 8″ telescopes. The same applies to all but the brightest galaxies.
- Typical objects for each half:
- Fall first half: M13, M57, Albireo
- Fall second half: h&Chi Persei (NGC 884 and 869), Snowball Nebula (NGC 7662), M31
- Spring first half: M42, Eskimo Nebula (NGC 2392), h&Chi, M44, Castor
- Spring second half: M3, Castor, M44, M81
- Check out the objects list used for observatory during the Fall, Winter, Spring, and Summer.
- Objects:
-
- Constellations:
- Easy-to-recognize constellations such as Orion, Canis Major, Cassiopeia, Cygnus, Leo, and Sagittarius, as well as asterisms like the Big Dipper and the Summer Triangle are always winners.
- How to use a sky chart
- Finding North with the Big Dipper
- The zodiac constellations and the ecliptic … perhaps including Ophiuchus
- Constellations:
- General:
- Point out the effects of the Earth’s atmosphere by comparing the twinkling of stars of the same brightness near the horizon and near zenith.
- You can also mention why planets don’t twinkle.
- Point out stars of different colors and talk about stellar evolution.
- Describe the Solar System using a scale model to give people an idea of the sizes and the vastly different bodies there are.
- Point out the Milky Way (if visible), the galactic center, and give people an idea of the scale of it all.
- It’s also a great trick to check on Heavens Above and see if any satellites will be visible.
- If Jupiter will be up, check to see if the Great Red Spot will be visible
Troubleshooting the Tombaugh Observatory:
Note — this section is not meant to be complete, nor is it meant to provide instructions for telescope operations. This section is meant to provide assistance in the event of a mechanical failure.
Problem: South Dome Won’t Close
- Solution 1: If you opened both the slit and the windscreen, make certain the wind screen is all the way open. If you stop it before it reaches its limit, it will not close when you hit “Close All”
- Solution 2: If solution 1 didn’t work, you may have bigger problems. Cover the telescope with a plastic sheet/showercap before moving on, to prevent damage to the scope.
- There are two systems driving the dome. The box next to the door only controls the position of the slit. The closing mechanism and electronics are contained in the box on the dome itself.
- Check the gray control box. If the LED is on and/or the amp meter is showing a positive reading, try solution 1 again.
- If the LED is off and/or the amp meter shows 0A, there are a couple of solutions you can try.
- TURN OFF ALL THE ELECTRONICS BEFORE PROCEEDING
- Check the right side of the gray control box. You should see three black knobs for fuses. One by one, remove them and visibly check the fuse. If one is blown, there should be spares in the top drawer of the desk. The box takes a 150V/10A fuse. If you do not have spares of the 150V/10A fuse, you can get the dome closed with a 150V/5A fuse, but this is obviously not recommended as a long-term solution.
- If the fuses are intact, it is likely the car battery died. This is not ideal. It is likely you will have to leave the dome open for the rest of the evening. Cover the telescope and anything else you can.
- Explanation time: The dome closing mechanism is driven by a car battery. During the day, the car battery is recharged by a solar panel on the front of the dome, much in the same way the alternator would charge it in your car. The last time the battery was replaced was April 4, 2019 (update that, future folks!). Generally, you can expect a battery to last 4-5 years in New Mexico, so hey. How’s 2023? Chill, I hope.
- You’ll have to replace the car battery. In the morning, go to Ofelia and get the Pcard to pay for the new one. You’ll need a ladder and a socket wrench with a 1/2 inch (I think) socket. The car battery is in the black box to the upper left of the control panel. Bring your tallest grad student. You can remove the battery the same way you’d remove a car battery — loosen the terminals, and pull them off, one at a time, taking care not to cross the streams. There is nothing holding the car battery in, you can lift it out once the terminals are loose. Be careful — it weighs approximately 10kg, and it’s high up. DO NOT TILT THE BATTERY — car batteries are lead acid batteries, and you can access the fluids via the top. Don’t.
- It’s worth noting that as of 2019, we do not have a ladder at the observatory tall enough to access the battery. I do not recommend stacking the step stool onto the large metal platform in south dome. Call around. Find a bigger ladder. Maintenance will have one.
- Take the old battery and the Pcard to Autozone. There’s one on S. Main St, about a mile from the department. Remember, you’re tax-exempt. Get the same battery, and if they ask for warranty information, it is:
- Ofelia Acosta, (575) 646-1868. We told them the battery was for a 2003 Chevy Malibu (don’t look at me like that! They needed a car to put in their computer!) Hopefully that saves the department some money.
- Install the new battery, and get it closed!
- Solution 2b: During the day, check the small black box above the control panel. A red LED light should indicate the battery is charging. If it isn’t, there is likely a problem with the solar panel charging the battery. At this point, it is way above your pay grade. Go to the department head, show them this page, and tell ’em Sean sent you. Good luck!
- In the Event of An Emergency (ex: It is about to start thunderstorming and the battery died): You might be able to jump start the battery long enough to get the dome closed. Pull a car up as close as you can and get the battery out, as above. Before jumping the battery, take a screwdriver and carefully pry open the panels on the top of the battery, exposing the electrolytic fluid inside the cell. Seriously, it will burn you if you get it on you. There should be fluid covering the cells in the battery. If there is no fluid, you can temporarily replace it with water, but change the battery as soon as humanly possible afterwards. Once you have verified that there is fluid inside the wet cell, close the panels on top and jump the battery.
- With your engine off, connect the positive terminal of the dead battery to the positive terminal of your vehicle. Then, connect the negative terminal of your vehicle to a ground point. The fence should work for this, as long as no one’s leaning on it. You’ll see a spark — that’s okay. Start your car, and, while in park/neutral, rev your engine to ~2000 rpm for 5-10 minutes to charge the dead battery. Disconnect the terminals in the opposite order from above. Leave your vehicle idling to allow the alternator to charge your battery back up.
- Refit the battery (I would just rest it on top of the cinder blocks rather than putting it back in the box), and close the dome. If you had to open the cell, go wash your hands thoroughly with soap and water.
Department Open House
One Friday a month during the school year, the department opens the Tombaugh Campus Observatory to the public for our Department Open House. for roughly an hour. Both faculty and grad students help out for this event. Together they might pick the objects to show in the telescopes, but it’s the faculty member’s responsibility to prepare and give a talk and the grad students’ responsibility to run the telescopes/laser pointer/hand out sky maps (in English and in Spanish!). We suggest you print a sky map out in color, first, and then make black and white photocopies (darkening it slightly). If you print the sky map out on the black and white printer, the Milky Way vanishes completely.
This event does not count as community service, but each grad student is assigned to one night per year. Someone (usually Tom Harrison) will e-mail a schedule to everyone around the beginning of the fall semester. You are allowed to switch nights with other students; just make sure to let the faculty members know.
There should be mini-schedules at Tombaugh Observatory so visitors know when the next open house is.
Department Resources: Laptops, Projectors, and Telescopes
For public outreach talks you can sign out laptops and portable projectors. They are stored in the astro dept server room (AY 116A). There is a sign out sheet which should be on a clipbard on the table. Please remember to sign out and sign back in anything you take, otherwise we have people wandering around the department looking for the Dell projector. Remember to test your talk before you leave the building to ensure the presentation file, laptop, and projector are all working. The password for the laptops should be the same as for the computer in BX102.
Remember that the department has two official vehicles which you can use to transport whatever you need for your event.
Telescopes and other sky watching equipment
Sometimes people ask about the magnification power or focal length of the telescopes. These have been provided using the following relations:
focal length [mm] = f number * aperture
magnification = telescope focal length/eyepiece focal length
-
- 16″ Dobson
F Number 4.5 Aperture 406mm Focal length 1829mm Eyepiece Magnification 2in 36x This is the large white pillar (the “white whale”) usually stowed in the North dome. Be careful when rolling it, for the part with the wheels is not attached to the telescope frame, which is not attached to the telescope. The end result is that it is alarmingly easy to tip over the telescope, especially if people lean on it as they look through it. This telescope is not electronic in any way, so you need to know where you object is to point the telescope to it.
- 16″ Dobson
-
- 12″ telescopes
F Number 10 Aperture 305mm Focal Length 3050mm Eyepiece Magnification 10mm 305x 17mm 180x 20mm 152x 36mm 85x 40mm 76x These telescopes are the equatorial mounts in the two domes at Campus Observatory. They’ve got power outlets in the support pillars, but always make sure to turn off and unplug the telescopes after you’re done using them. If you don’t, the telescope will continue to track the object right until it pulls out its own power cords (yes, this happened once). These telescopes need to be pointed if you want to slew automatically to objects and to track. In order to point the telescopes properly, you’ll need to use 2 or 3 reference stars. It’s helpful to have a general knowledge of the night sky, including a few bright stars for each season, so you don’t make a mistake in pointing.
These telescopes also have battery-powered Telrad finder scopes. Please remember to turn them off after using them, otherwise the battery drains and has to be replaced.
- 12″ telescopes
-
- 8″ telescopes
F Number 10 Aperture 203mm Focal Length 2032mm Eyepiece Magnification 10mm 203x 17mm 120x 20mm 101x 36mm 56x 40mm 50x The telescopes are powered either by batteries (C) or from an outlet with the power supply. There is one in one in the North dome which is already mounted on a tripod, and there is one in the server room (Astronomy Building, first floor, through the glass door in the downstairs printer room, in a large box under the table), which has a tripod somewhere in the server room. These telescopes need to be pointed if you want to slew automatically to objects and to track. In order to point the telescopes properly, you’ll need to use 2 or 3 reference stars. It’s helpful to have a general knowledge of the night sky, including a few bright stars for each season, so you don’t make a mistake in pointing.The finder scopes of these telescopes tend to get bumped off alignment a lot. Before you check the pointing, use a distant light or telephone pole to check that the finder scope cross hairs are lined up with what the telescope is actually seeing.
There is an azimuth lock (little left-right knob at the base of the U-mount) and an altitude lock (wheel on the right-hand side of the U-mount … right-hand side as you look through the telescope, that is) on the telescope. These need to be engaged if you are using the computer to slew and track. However, If you lock the telescope and then try to move it by hand, you will grind the teeth off the plastic gears. Also, keep the Azimuth lock knob loose (unlocked) when moving the telescope around to avoid accidental grinding.
The department also has one or two old 8″ Celestrons; if you want to use them, let Tom know. They sort of track, though they do make lots of grinding noises, but it is a much faster set-up: a rough polar alignment and off you go. However, the finder scopes aren’t that good, and you need to be able to use them to point.
Tracking issues
Note that the default mode of operation for all of the Meade telescopes is to be in Alt/Az. We have to manually select “polar” mode for the pier-mounted telescopes to allow them to point and track properly. So,
a) if the the telescope will not slew correctly to an object, or
b) is tracking in a funny way
this is the problem. To cure it hit “mode” on the hand paddle, go to “set up”, “telescope”, “mount”, and scroll down to “polar” and hit enter. A little checkmark will show up. Then hit mode until you are out of that menu. [Note: the portable 8″ Meades should be in Alt/Az!]Power issues
You will know if there is no power because the red LED on the mount is not lit. All of the Meades now take 12V DC in, so all of the various transformers should work. They also all can be battery powered using 8(!) C batteries. There are little compartments on the inside of the base of the arms of the U-mount.
- 8″ telescopes
-
- 4″ telescopes (Konus 500s)
These are equatorially mounted telescopes for use in lab and outreach. They are 114mm F/4.3, so with the supplied 17mm and 10mm eyepieces, the magnification will be 28X, and 49X. They have little motors and zero-power finders. They are light and compact, and will work for the Moon and star clusters. They are currently stored in the South dome.
- 4″ telescopes (Konus 500s)
-
- Laser pointers
There are usually two high-powerd laser pointers stored in the North dome, in the closet, on the shelves to the left, in a small metal case (which resembles a case for eye glasses). These are fantastic for pointing out constellations but suffer if there is a lot of moonlight or not much stuff in the air (to reflect of off back to our eyes). People generally are more interested in the laser pointers than anything we show them in the telescopes!
- Laser pointers
-
- Filters and eyepieces
There are a variety of filters ranging from light to dark and in different colors. Individually, they’re in small boxes with clear plastic tops, usually stored together in a medium-sized black plastic case either in the closet or on the table in the domes. There should also be a set stored with the 8″ in the server room. Tom notes that he has a white light filter for use with solar observing. These are stored in his office, so if you want them for a public event, you’ll have to ask him directly.
- Filters and eyepieces
- Solar Telescopes
We have a few solar telescopes that are great for observing sunspots, transits, and solar eclipses. They are also used in the 110 Sun lab, so you’ll most likely get to use them at some point. We have two styles: (1) The old gold cylinders than are on camera tripods, and (2) The new electronic telescopes. The old telescopes are very easy to use: just point them at the sun. There is a small aperture near the eyepiece that operates as a finder scope by turning white when the telescope is close to being aligned. The new telescopes require a fair bit more finesse:- Manually align altitude axis to “0”.
- Insert compass/bubble level into eyepiece holder.
- Rotate compass/level until N-S alignes with telescope tube.
- Loosen Azimuth axis knob (bottom), rotate until compass points to N (red end of arrow points to North).
- Adjust leg height until bubble level centered.
- Power on telescope, press “Mode” key (let telescope find time).
- Press “Mode” key until “Select Item” appears.
- Scoll to “Set-Up”, press Enter.
- Scoll to “Targets”, hit Enter, select “Astronomical”, hit Enter.
- Use paddle to slew to Sun (note the speed select key is #1 and #9 is the slew speed, so press “1” then “9”).
- Center the sun in the little projection finder on the top of the tube (use speed “5” once it is in the eyepiece).